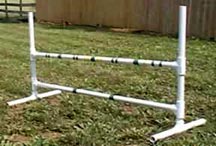
Build a PVC Practice Jump
Working with your dog at home will help to polish your skills as a handler and help him learn what you want, as well as help condition both the dog and you. Jumps are the easiest equipment to build and move about, and can be used to teach your dog turns, to work away from you, to call off another obstacle -- basically all the handling skills you will need to conquer most of the challenges presented on agility courses. Here is a simple practice jump you can build cheaply and quickly. Four to six of these babies will do wonders for you and your dog. |
|
To build one jump, you will need: (All schedule 40 PVC, 1" ID) 6 - 1" PVC T's
This will make a jump that has a base about 6" (enough for a little dog to learn on), a second bar at about 12", and by flipping the top assembly, a bar at 18". If you have a tiny dog you can stop at bar #1 and just put a couple of pieces of PVC pipe into the T as standards (and save yourself the cost of the extra two T's and the pipe for the second bar). |
|
Step 1 (Base assembly): |
| Step 2: Add a second T at a right angle to the first one. |
Step 3: Insert one long bar into T from Step 2. Assemble another base just like the one from Step 2, inserting the long bar into the top T. Voila! Your base is created! |
As mentioned above, this base can be all you need if you have a mini dog. It is useful for the dog's visual orientation if there are uprights in the empty holes of the T, making jump standards (they can be a mere 6", which makes the total standard height about 12" ). These little jumps make great jumps for teaching puppies about jumps, too. Step 4: Insert your 6" PVC lengths into the top, empty hole of the T. Step 5: Add a T above that, facing in the same direction as the T in step 2. Now you may put the second long jump bar into this T. Repeat the upright assembly for both sides, of course. This makes a jump which is about 12-13" high. Step 6: Place the 12" lengths in the top of the T. These are the standards, making the jump look like a jump. To make this jump 18-19" high, pull out the assembly which consists of the 6" lengths, the top jump bar and the 12" lengths, and flip it so that the 12" pipe will be inserted into the T's. Now you have your high jump. You may of course make any of the upright lengths any height you desire, based on the height of your dog and his training status. Optional caps may be placed atop the uprights (cosmetic, and it may help to keep water out of the pipe, if that's an issue for you). Add colored tape as desired and let the training begin!
 |
This information was provided by Mountain View Dog Training for educational purposes only.
|