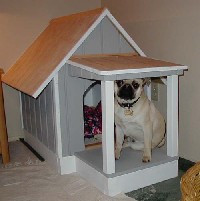
Build your own dog house
This doghouse is designed with the beginner in mind. It might even be a good project to involve the kids. The entire project requires only one sheet of plywood, two 2"x4"s and one 2"x2". All of these materials are available at your local hardware store.
Supplies:
1PC - 4'x8' Exterior Grade Plywood Sheathing (5/8" thick)
2PC - 2"x4"x8' Pressure Treated
1PC - 2"x2"x8' Untreated
1 Box - 16d nails
1 Box - 1-5/8" Galvanized Deck Screws
1 Quart - Exterior Grade Paint
Construction
This doghouse plan is very easy to build and requires a minimum number
of tools. Most beginners should be able to finish the project in a
day. The only tools required are:
· Tape measure
· Circular saw or table saw
· Drill - with drill bit and screw driver bit
· Spade Bit (3/4" or larger)
· Hammer
· Paint Brush
· Pencil
· Safety Glasses
· Carpenters Square
There are a couple of important considerations when building and designing a doghouse. Please keep these in mind if you plan to modify the plans to fit your needs.
1. Don't use pressure treated wood on any parts the dog may chew.
2. The doghouse should be raised from the ground to keep out moisture and help insulate the dog from the cold.
3. The doghouse should be large enough for the dog to comfortably turn around but small enough to retain the dog's body heat.
Shingles
We decided to cover the roof of this doghouse with cedar shingles. A
simpler, less expensive option is to paint the top of the doghouse or
use asphalt shingles.
Plywood
The doghouse should be built from an exterior grade plywood. Most of
the plywood you will find at your local hardware store is not exterior
grade. Exterior grade plywoods have special glues that prevent the
layers from coming apart when they get wet. Do not use Pressure
Treated (PT) plywood, it contains preservatives that can be toxic to
your dog. The best
material to use is an exterior plywood sheathing. This wood is designed
to be used on the outside of a home. It has a "rough cut"
surface with grooves cut into the surface for decoration. We used
exterior grade sheathing that has the grooves 4" apart. You can
also get the plywood with grooves 6" apart.
The edges of exterior grade sheathing are "tongue-n-groove". This means that there is a little lip on one edge that fits in the groove on the opposite side of an adjoining piece of plywood. We do not need these parts and will cut them off of the plywood sheet. You might want to ask a salesperson at the hardware store to do this for you before you leave. All plywood parts of the doghouse are assembled using 1-5/8" decking screws.
Foundation
Because the foundation of the doghouse will sit on the ground we used
pressure treated 2"x4"s. It is unlikely that the dog will
chew these boards however if you think your dog may gnaw on them you
may want to use untreated wood and paint it. We also drilled 1"
holes in all sides of the base to allow ground moisture to evaporate
and prevent rotting. The foundation is nailed together using 16d
nails.
Roof
The roof to this doghouse is designed to be removable. This will allow
for easy cleaning of the interior areas.
Front Porch
The front porch is a nice touch to this design. Our dogs love to hang
out on the porch in the shade. If you prefer you can easily leave this
part off.
Porch Posts
The porch posts are made from untreated 2"x2"s.
Click on Image to Enlarge
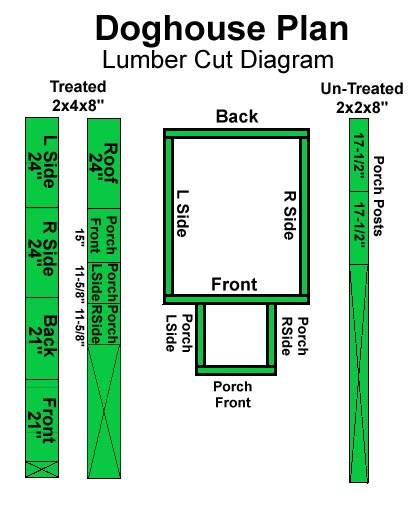
Step 1 - Print Cut Lists
Click on the images below and print the enlarge cut lists.
Step 2 - Layout the Parts
Before making the first cut you should lay out all of the parts. This
means measuring and marking all of the parts onto the plywood and 2x
lumber. Use a carpenters square to ensure straight perpendicular
lines. It is also a good idea to label each part for identification
later.
Step 3 - Cut the Parts
After you lay out all of the parts cut them out with a saw. Be careful
not to cut into any other parts and try to make your cuts as straight
as possible. Trim off the tongue and grooves before cutting the
parts out.
TIP - If you don't make a cut perfectly straight don't worry.
You can probably fill in the gap with caulking compound before
applying the final paint job.
Step 4 - Assemble the Parts
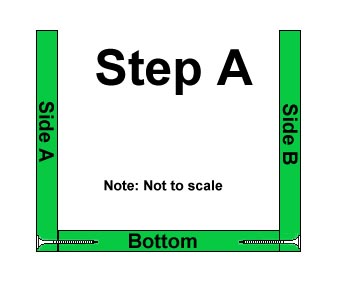
Click on Image
to EnlargeStep A - Place the "BOTTOM" on your workbench and attach "SIDE A" and "SIDE B" to the base using 1-5/8" galvanized deck screws. The screws should go through the "SIDE PIECES" into the "BOTTOM".
Click on Image
to EnlargeStep B - Attach the "FRONT" and "BACK" parts to the "BOTTOM" and "SIDE PIECES".

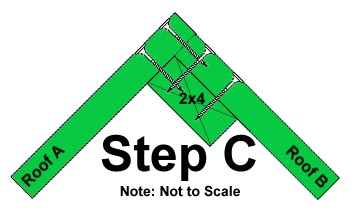
Click on Image
to EnlargeStep C - Attach "ROOF A" and "ROOF B" to the "ROOF 2x4"
TIP - The "ROOF 2x4" should be centered between the roof sections.
Step D - We are now going to assemble the 2x4 base. Use 16d nails and assemble the 2x4 parts as seen in the "Lumber Cut Diagram". Pay special attention to overlapping the lumber as seen in the diagram. After you assemble the base, use a 3/4" (or larger) spade bit to drill two holes in both the "R SIDE" and "L SIDE" of the base to allow moisture to escape.
Step E - Attach the body to the base using six 1-5/8" galvanized deck screws. Screw through the "BOTTOM" into the base making sure to sink the screws slightly into the wood to protect your dog from sharp edges.
Step F - Attach the "PORCH BOTTOM" to the base using six 1-5/8" galvanized deck screws making sure to sink the screws slightly into the wood.
Step G - Attach "PORCH ROOF SIDE A" and "PORCH ROOF SIDE B" to the "PORCH ROOF". Screw through the roof and into the side pieces.
Step H - Attach the "PORCH FASCIA" to the front of the "PORCH ROOF"
Step I - Attach the "PORCH POSTS" to the "PORCH ROOF"
Step J - Attach the "PORCH ROOF" to the body of the doghouse by screwing into the roof and roof sides from the inside of the doghouse. Also screw through the "PORCH BOTTOM" into the "PORCH POSTS" to secure them in place.
Step K - Paint the doghouse using an exterior grade paint.
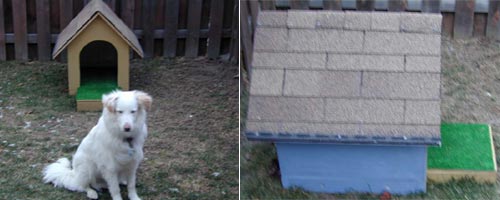
Note: The roof is not attached to the doghouse body. It sits on the body and is removable for cleaning.Congratulations! Your dog now has a new home. We hope you enjoyed the plans. Please let us know how the project went for you. We'd love to see a picture of how you decorated the house! (see below)
Visitor Pictures:
Content provided by: WoodZone.com for educational purposes only.